
After using a system, solution or tool for a longer period of time, it usually either becomes a bit messy and/or you come up with other structures that you would rather have used. Just think back to how often you moved and reorganized folders back in the day when you were working against file servers. Then it was relatively easy to change the order of the folders in the structure you had built, but that was probably also the only advantage of working with folders on a file server. Enough about that. Today, we work in a more modern way and with tools that give us significantly more dimensions and possibilities.
Most of us who work a lot with Microsoft Teams are sometimes asked how to move a channel. The most common answer from me when I get this question is the counter question: “Do you need to move all posts as well or is it enough to move the files?”.
As you can see, my counter question is worded in a way that means that the answer is usually “Moving the files is enough”. But sometimes it is of course important to also move the dialogue that took place in the current channel. Moving an entire channel with associated dialogue, Apps, Planner and files has not been so easy before.
There are some good migration tools on the market. I have always been fond of ShareGate. In the past I have used (and still use) ShareGate when, out at clients, migrating files from a document library in a SharePoint site to a document library in another SharePoint site or move an entire document library with content types and site columns with content (with preserved properties) to another SharePoint site. It also works great for moving a SharePoint site from one tenant to another. I have also used ShareGate for reporting to get a good overview of SharePoint sites, owners, usage and content. An invaluable help with migration, governance and reporting. It saves time for me and thus also for the organizations and companies i work for.
Cloud Copy
My new favorite feature in ShareGate is “Cloud Copy“. With Cloud Copy, you get the opportunity to move channels from one team to another. Not only that, you can also move a Team from one tenant to another tenant and you can also merge an existing team together with another team.
Below I will show step by step how simple it to move channels from one team to another.
Open Cloud Copy
When you have bought the license and created an account where you entered some information about yourself and entered your license key, you just go to https://home.sharegate.com/cloud-copy and this start screen will be displayed.

Select what you want to copy

Connect to your source tenant
Here you specify in which – and connect to the tenant in which the team/channel is located

Enter the source team
In the search field that now appears, enter the title of the current team

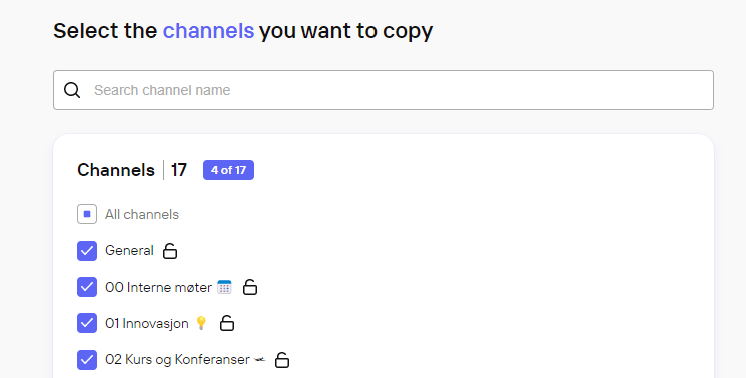
Enter the source channel(s)
Similarly, you can search for and/or enter the name of the channel you want to copy
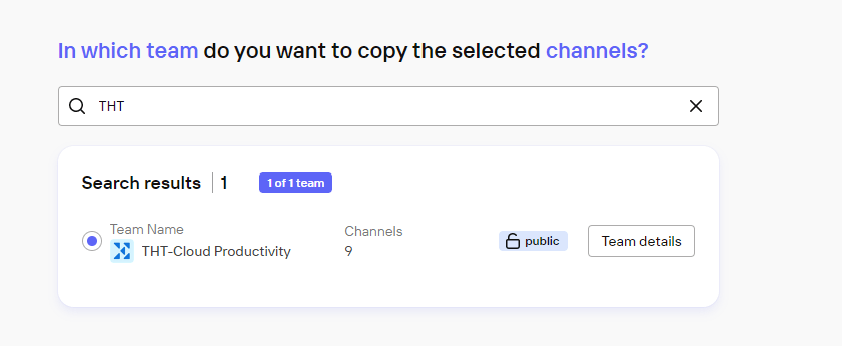
Select and connect to the target tenant

Enter the target team
That is, the name of the team to which you want to move the channel or channels.
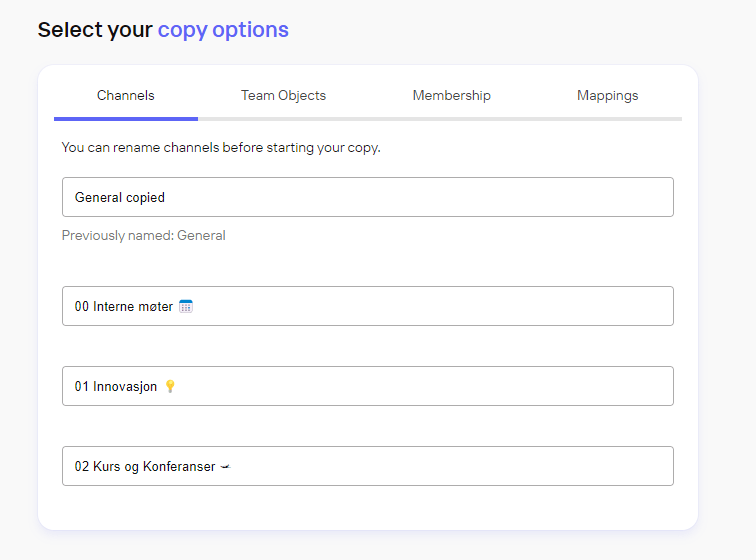
Copy Options
Channels
In this form, you get the opportunity to rename the channels (in the target team) in connection with the copying.
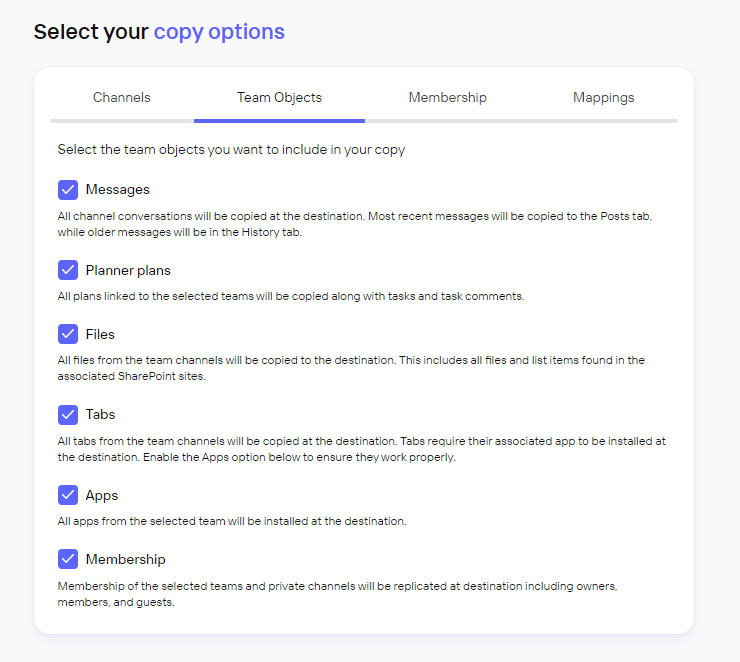
Team Objects
In this form, you get the opportunity to choose which of the channel’s objects you wish to be copied
Membership
Here you can choose whether you want to bring the channel’s owners/members with you or not
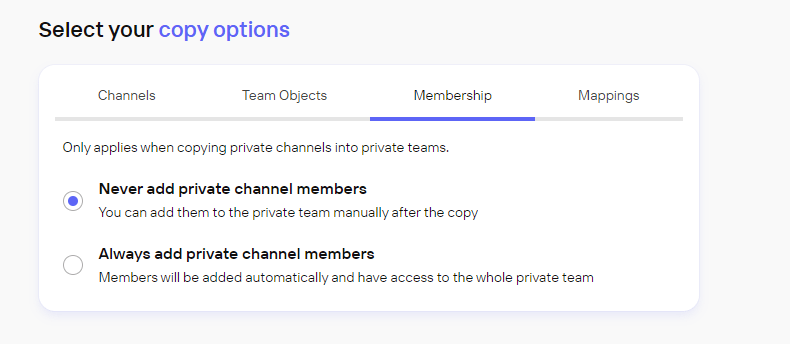
Mappings
If a member is in the source but not in the target, or if the member has a new/different username in the target, you can map it in this image so that it is correct.

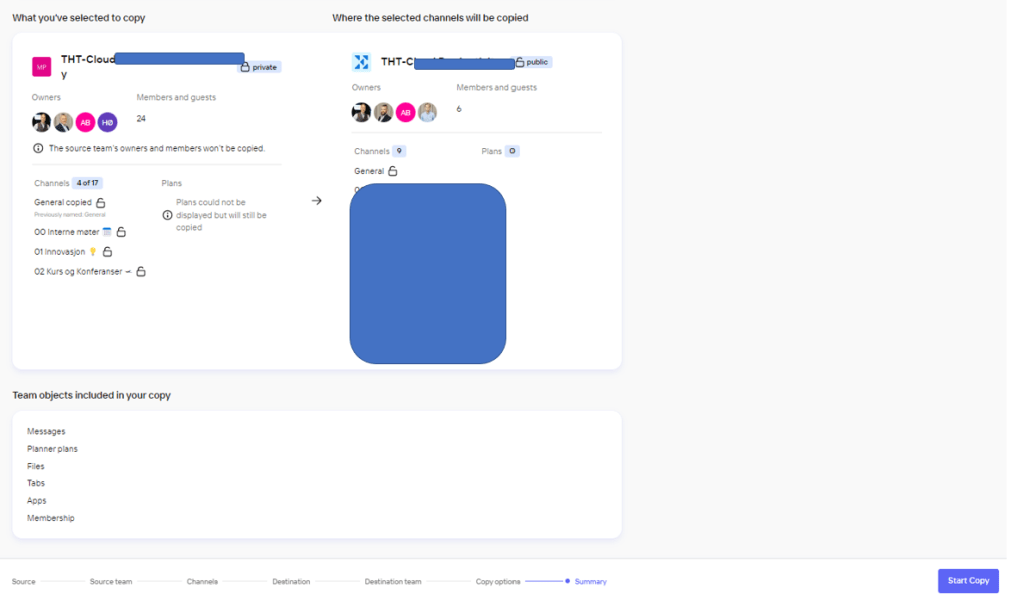
Summary of your choices
You will now be taken to an overview screen showing which channels and elements you have chosen to copy from the source to the destination. If you are satisfied with what you see in this summary, click, at the bottom right, on the button “Start Copy” and thus start the copying.
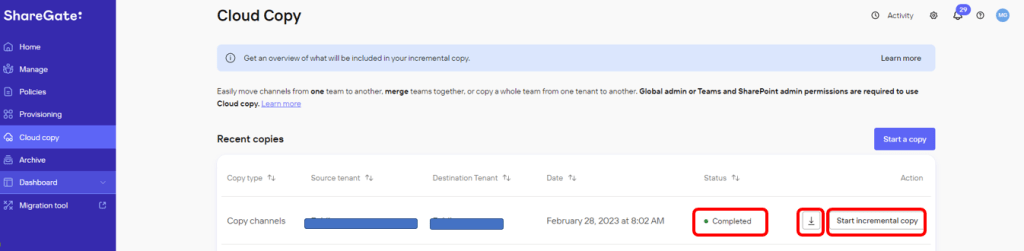
Overview of previously executed jobs and ongoing jobs
When you have started the copying, a message is displayed to confirm this. You can either stay on that screen until it notifies you that the job has completed or you can go back to the overview that shows previous and ongoing jobs with their status.
When a job is completed, it is displayed with the status “Completed”. An icon appears on the right side of the status, and if you click on it, a report of how the job went is displayed. On the far right, you can, if you wish, start an incremental copy to get changes made since the last run. This can be especially useful when you migrate entire teams and want to split the runs into a basic one followed by a supplementary one.
Final words
This is as simple as it can be. If you need more advanced mappings and batch migrations, you can use PowerShell scripts together with the “ShareGate Migration Tool”. It is, as i said, for more advanced migrations and then, quite naturally, requires a little more knowledge. For my part, with a little planning and structure, i have managed very far with Cloud Copy alone.
If you want to read more about the possibilities with Cloud Copy, i recommend that you do so here.


You must be logged in to post a comment.